
What biomes are on the Lootbound map?
Dungeon, Forest, and Desert. Each is a branching node path that ends in a Boss Part. Official copy does not name a fourth biome. The demo’s third biome was shortened — treat 1.0 Desert as a full gate.

Lootbound map: route Dungeon, Forest, Desert. Combat, elite, camp, blacksmith, training, treasure, companion, and D20 dice rooms. A failed roll can pay nothing.
Watch a 1.0 run open the map legend, take a training node, roll a D20, then spend an extra die when the first roll fails.
~13 min read
The Lootbound map is a branching node path through Dungeon, Forest, and Desert. You pick a route, take a fight or a side room, pack the drop, then walk toward a biome-end Boss Part. Lootbound (ArtDock / Dreland Enterprises) sells that as “choose a route that leads to valuable loot” on Steam. This page is the route catalog — biomes, nodes, and when a D20 is worth the empty-handed fail. Verified August 15, 2026.
| Fact | Detail |
|---|---|
| Platform | Steam · Win / macOS / Linux · Xbox Series |
| Genre | Pixel top-down tactical roguelite |
| Map type | Branching node path — you choose the next encounter |
| Biomes | Dungeon · Forest · Desert — three confirmed gates |
| Combat nodes | Common fight · Elite |
| Support nodes | Camp · Blacksmith · Training · Treasure · Companion |
| Risk rooms | Dice rooms (pick reward difficulty, then D20) |
| Biome end | Choose 1 of 2 Boss Parts, then the next biome |
| Hub (not on the map) | Barracks · Game Room · Laboratory — shards / seals after the run |
| Steam | App 3091140 · Mixed reviews at launch |
Steam’s line is the whole rulebook: every run starts solo, then you move across the map and choose a route that leads to loot. Along the way you meet companions. ArtDock calls the same thing directed map choices — encounters, risks, rewards, and progression points, not a hallway. The Lootbound map is that choice, repeated until the biome gate.
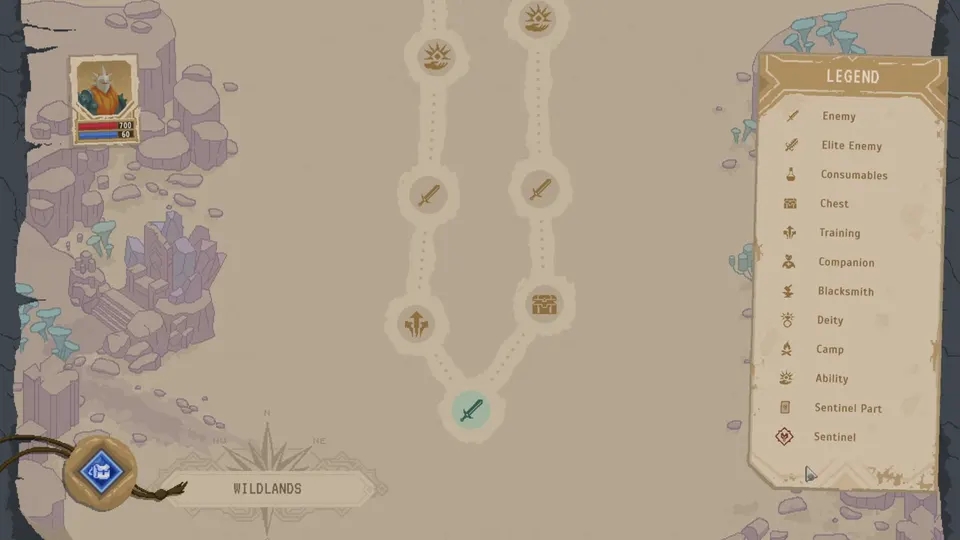
| Step | What you click | What you walk away with |
|---|---|---|
| 1. Read the icons | The next two or three branches | A fight, a room, or a dead end you skipped |
| 2. Take the node | Combat, elite, camp, shop-style room, or dice | Loot, a heal, an enchant, a recruit, or nothing |
| 3. Pack before the next icon | Rotate the drop onto a grid | A kit that actually exists in the next fight |
| 4. Hit the gate | The biome-end Boss Part pane | One modifier on the final Guardian |
Between expeditions you spend Shards and Seals at Barracks, Game Room, and Laboratory. Those rooms buy permanent stats, extra dice, and potions. They do not sit on the biome path. If you are standing on a node icon, you are already in the run.
[Turn Based Lovers](https://turnbasedlovers.com/review/lootbound-impressions/) describes a node-filled map with branches that offer different rewards before the closer. This wiki will not invent a node graph or spawn rates. Read the icons in front of you. Official copy does not publish a per-biome probability table.
Once you can read the icons, the next question is which biome those icons sit in.
Confirmed biomes: Dungeon, Forest, and Desert. Reviews name those three as the full expedition — [Technetbook](https://www.technetbooks.com/2026/08/lootbound-review-art-dock-roguelike.html) and [TechTimes](https://www.techtimes.com/articles/324346/20260813/lootbound-launches-today-inventory-auras-turn-gear-placement-build-design.htm) both treat them as the gates before the assembled Guardian. Official copy does not name a fourth biome.
| Biome | What is confirmed | What stays TBA |
|---|---|---|
| Dungeon | First gate. Opening node map + first Boss Part | Exact node count, enemy roster, soundtrack title |
| Forest | Second gate. Distinct visual theme from Dungeon | Layout, elite density, unique room list |
| Desert | Third gate. Full 1.0 length — demo had a shortened version | Whether UI labels it Act 3, Desert, or both |
| After Desert | The assembled Guardian / Sentinel fight | A published fourth biome — there is none |
Turn Based Lovers notes all three biomes keep distinct visual themes. Later biomes also drop stronger shapes than earlier ones — that is a loot-power curve, not a new icon set. Combat, elite, camp, blacksmith, training, treasure, companion, and dice rooms can appear on any of the three paths. Do not wait for a “Desert-only” room name that this wiki has not logged.
The third biome had a shortened demo layout. Treat 1.0 Desert as a full gate: another route, another Boss Part, then the closer. If a demo note says the last stretch is a sprint, confirm it in the live build.
The icons on those three paths are the rest of this page.
Public writeups and 1.0 play agree on the same icon jobs. Use this as a catalog, not a spawn table. This wiki will not invent how often an elite or a dice room appears.
| Node | What it is for | First-run rule |
|---|---|---|
| Combat | Common fight. Loot + a shape to pack | Take it when the board still has holes |
| Elite | Harder fight. Better drop, more Health risk | Take it if armor is full and Health is not already critical |
| Treasure | Chest / loot node without a full trash pack | Priority in the opening biome — one strong shape can lock the lane |
| Companion | Recruit a leftover class onto its own grid | Take the first one. You start solo |
| Camp | Campfire. Health recovery between fights | Spend it before a dangerous stretch, not after a wipe |
| Blacksmith | Enchant / gem a piece you already wear | Gem the shape that will still sit two biomes later |
| Training | Risk node. Dice for a stat or upgrade, no new shape | Worth a roll when the reward does not eat inventory space |
| Dice room | Pick reward difficulty, then roll a D20 | Only if a fail still leaves a run |
| Boss Part | Biome-end two-card pane, not a side room | Always pick one — it is the Guardian you will fight |
Trash nodes grow the board. Elites tax Health. Armor comes back after every fight; Health does not. If the next icon is an elite and the party is already thin, the camp on the other branch is the route, not a coward’s skip. Fight rules: combat.
You start alone. A companion node is the only way a second grid enters the run. Pack that recruit their own job — Crush, Acid, or Order — not a clone of the hero. Roster: classes.
With the catalog in view, the next decision is which icon you actually walk to.
This is the mid-run decision table for the Lootbound map — situation to action, not another loop recap. Community 1.0 routing from [10 Lootbound Tips](https://www.youtube.com/watch?v=AP9tnXcNAfY) is consistent: early acts build the inventory, later acts strengthen it.
| If you need… | Take this branch | Skip or take the safer icon |
|---|---|---|
| A shape that can lock the lane | Combat, treasure, or the biome-end loot list | A hard D20 whose fail leaves the board empty |
| A second body | The companion room, even if the fight looks worse | Another chest while you are still solo |
| Health before an elite line | Camp now | One more trash pack “to be efficient” |
| A kit that already works | Blacksmith or training on a piece you will keep | A random chest that forces a full rebuild |
| One missing aura contact | The node that can drop a compact shape | A divine-sized block that deletes three neighbors |
| A Boss Part you can live with | The gate — do not detour past it | A side dice room that can empty the run first |
| Extra dice still in the pocket | A hard reward that finishes the kit | Gambling every room because the die is there |
| No spare die, thin Health | The safe upgrade or the camp | The top-tier D20 line |
Chests, common fights, and the biome-end pick list matter more in Dungeon than a gem on a temp sword. HeadClick’s 1.0 run ([I8QzZBQV0Fw](https://www.youtube.com/watch?v=I8QzZBQV0Fw)) keeps swinging at training when the reward is a flat damage number that does not eat a cell — that is a later-act habit you can start once one strong shape is already seated.
By Forest and Desert the grids should already speak a damage language. Trainers and blacksmiths get better because the piece you enchant will still be there at the Guardian. Act / biome naming in the UI may say Act 1–3; the three confirmed biomes are still Dungeon, Forest, Desert.
The one node that still tricks first runs is the room that asks you to roll.
Matched by build plan, shared topics, and guide progression — not random related links.

Steam’s risk line is short: in special rooms you are offered several options with different difficulty levels. The more valuable the reward, the harder it is to obtain with a dice roll. Reviews fill in the table you actually click: pick a reward line, roll a D20, spend an extra die if you have one, and walk out empty-handed if the roll fails.
| What you do | What is confirmed | What this wiki will not invent |
|---|---|---|
| Pick a reward line | Several options; reviews describe three, ascending in power | A published DC table per reward |
| Roll a D20 | Official “dice roll” · 1.0 clips show a D20 | That every room uses the same target number |
| Spend an extra die | Raises the chance. Does not guarantee the reward | Exact add, advantage, or reroll formula |
| Fail the roll | Can leave you empty-handed | A consolation prize list |
| Enter a new biome | Bonus dice refresh (reviews + 1.0 commentary) | How many dice you start with |
The tips video’s rule is the one that wins runs: take the difficult roll when the reward completes the build, when it is the only option that helps, or when you have an extra die. Otherwise take the safer upgrade. [Turn Based Lovers](https://turnbasedlovers.com/review/lootbound-impressions/) and [Technetbook](https://www.technetbooks.com/2026/08/lootbound-review-art-dock-roguelike.html) both watched the same fail state — extra dice still miss, and the node pays nothing.
The [Into Indie Games beginner writeup](https://intoindiegames.com/walkthroughs/tips-tricks/lootbound-beginners-guide/) treats training as its own risk node: you roll for an upgrade instead of a new shape. HeadClick’s opener does the same — a D20 that has to beat 12 for 50 slash, then a second die when the first roll dies. Count training as a dice-style room when you route. Do not collapse it into a fake “all rooms are identical” table.
Camp, blacksmith, and training still have a timing rule that is not a roll.
These three icons are how a healthy route stays healthy. They are not consolation prizes after you skip every fight.
Into Indie Games is blunt: many players burn the campfire when Health is already critical, and that is too late. Elite packs delete a thin party. Heal before the risky stretch. Armor will come back on its own; the campfire is for the bar that does not.
The smith attaches an enchanted gem — damage, crit, vampirism, armor, dodge, and similar lines. The enchant stays on that piece. If you will drop the sword in Forest, the gem is wasted. Wait until the shape is the one that still sits on a role grid at the Guardian. Lane talk: builds.
The biome does not end on a random elite. It ends on a two-card pane.
The last icon of Dungeon, Forest, or Desert is the Boss Part pane: one of two cards. Those parts change how the final Guardian / Sentinel looks and hits. After all three biomes, you fight the assembled boss. Skipping the pane is not a shortcut. It is how a first run walks into a Guardian it never planned for.
You pick at the end of the biome, not at the hub and not after every elite. A HeadClick 1.0 run shows the first pick around the Dungeon gate and extra dice coming back afterward — that refresh is the tell you have entered the next biome. Full part drill: bosses.
Chests and recruits before the gate matter because the pane reads against the party you actually have. A pretty pack you “save” by skipping the last treasure is still a Guardian you never planned. Name the thinnest body, then take the card that does not delete them.
If the same wipe repeats, it is usually a routing habit — not a missing legendary name.
Scan this before the next icon. Situation to action — not another biome recap.
| Mistake | Fix |
|---|---|
| Rolling every hard D20 | Only when the reward finishes the kit or you have a spare die |
| Treating a fail as “unlucky, try the next room” | A fail can be empty-handed — budget the miss |
| Camping at 10% Health after the elite line | Heal before the dangerous stretch |
| Blacksmithing a temp shape | Gem the piece that will still sit two biomes later |
| Skipping the first companion room | You start solo — classes |
| Walking to the next node with loot still in the pile | Rotate it or it is not equipped — inventory |
| Routing as if Barracks is on the path | Hub spend is after the run |
| Treating demo Desert as 1.0 length | Confirm the live third biome |
| Skipping the Boss Part pane | Pick one — it is the Guardian — bosses |
| Inventing node spawn rates | Read the icons. This page will not fake a percentage |
Before you click a branch, name the resource the node spends: Health, a die, or a gem on a piece you might drop. If you cannot afford that spend, take the other icon. Two seconds there prevents most empty-handed Dungeon exits.
When that is automatic, the sequel is the pane the route was for — the Boss Part that becomes the Guardian.
Dungeon, Forest, and Desert. Each is a branching node path that ends in a Boss Part. Official copy does not name a fourth biome. The demo’s third biome was shortened — treat 1.0 Desert as a full gate.
You choose a route on a node-filled map. Branches lead to combat, elites, camp, blacksmith, training, treasure, companion rooms, dice rooms, and a biome-end Boss Part. There is no published layout to memorize.
Combat, elite, camp, blacksmith, training, treasure, companion, dice rooms, and Boss Parts. Hub rooms — Barracks, Game Room, Laboratory — are after the run, not on the path.
Pick a reward difficulty, then roll a D20. Extra dice can boost the chance; they do not guarantee the reward. A failed roll can leave you empty-handed. New biomes refresh bonus dice.
No. Take the hard line when the reward finishes the kit, when it is the only option that helps, or when you have a spare die. Otherwise take the safer upgrade.
No. Training is its own risk node: you roll for an upgrade that does not eat inventory space. Dice rooms are the special rooms Steam describes. Both can fail. Both can spend extra dice.
Before a dangerous stretch — an elite line or the last walk of a biome. Health stays damaged between fights. Waiting until you are already critical is often too late.
No. Those are hub rooms you spend Shards and Seals in after an expedition. Game Room unlocks extra dice you later carry onto the map.
The bosses page — how the biome-end Boss Part becomes the Guardian. Then tips and the beginner guide.
August 15, 2026
Matched by build plan, shared topics, and guide progression — not random related links.