
How do Lootbound bosses work?
At the end of each biome you choose one of two Boss Parts. Those parts change the final Guardian’s appearance and power. After Dungeon, Forest, and Desert, you fight the assembled Guardian / Sentinel.

Lootbound bosses are not a fixed raid list. At the end of each biome you choose one of two Boss Parts. Those parts change how the final Guardian / Sentinel looks and hits. After Dungeon, Forest, and Desert, you fight the assembled boss. Lootbound (ArtDock / Dreland Enterprises) states that on Steam. This page is for players who already pack a grid and need the part choice to stop being a coin flip. Verified August 15, 2026.
| Fact | Detail |
|---|---|
| Platform | Steam · Win / macOS / Linux · Xbox Series |
| Genre | Pixel top-down tactical roguelite |
| Mode | Single-player |
| Final boss | Guardian / Sentinel — assembled from your Boss Parts |
| How you build it | At each biome end, choose 1 of 2 Boss Parts |
| What a part changes | Guardian appearance and power (Steam) |
| Biomes before the fight | Dungeon · Forest · Desert — three confirmed gates |
| Named roster | Not published. Blood Hand / Blood Head are community-observed / TBA |
| Combat rules | Same as any fight: turn-based, hero-only, companions auto-act |
| Steam | App 3091140 · Mixed reviews at launch |
Steam’s line is the whole rulebook: at the end of each biome you choose one of two boss parts; each part changes the Guardian’s appearance and power; after every biome you face the final boss. Lootbound bosses are a craft, not a bestiary. There is no official part list to memorize, and this wiki will not invent one.
| Step | What happens | What you decide |
|---|---|---|
| 1. Route a biome | Dungeon, then Forest, then Desert | Nodes, recruits, and the kit on each grid |
| 2. Hit the biome gate | A two-choice Boss Part pane (often after a fight + loot pick) | Which modifier the Guardian inherits |
| 3. Repeat | One part per biome — three confirmed biomes | A stack, not a single card |
| 4. Face the closer | The assembled Guardian / Sentinel | Whether the party you packed can live with that stack |
Reviews and 1.0 play both treat the pane as “build a boss.” [TechTimes](https://www.techtimes.com/articles/324346/20260813/lootbound-launches-today-inventory-auras-turn-gear-placement-build-design.htm) and [Turn Based Lovers](https://turnbasedlovers.com/review/lootbound-impressions/) describe the same loop: two parts per gate, a Frankenstein closer after three biomes, and a habit of picking what your party can counter. That is strategy, not flavor text.
Community 1.0 routing still grabs a short high-rarity loot list at the gate — exact offer size TBA. That list equips a grid. The two-card Boss Part pane equips the Guardian. Do not spend thirty seconds on the loot and two seconds on the part.
The next question is timing: the pane only appears when the biome is actually over.
You pick at the end of each biome, not at the hub and not after every elite. Confirmed biomes: Dungeon, Forest, Desert. The third biome had a shortened demo version — treat 1.0 Desert as the full gate. Skipping the pane is not a shortcut. It is how a first run walks into a Guardian it never planned for.
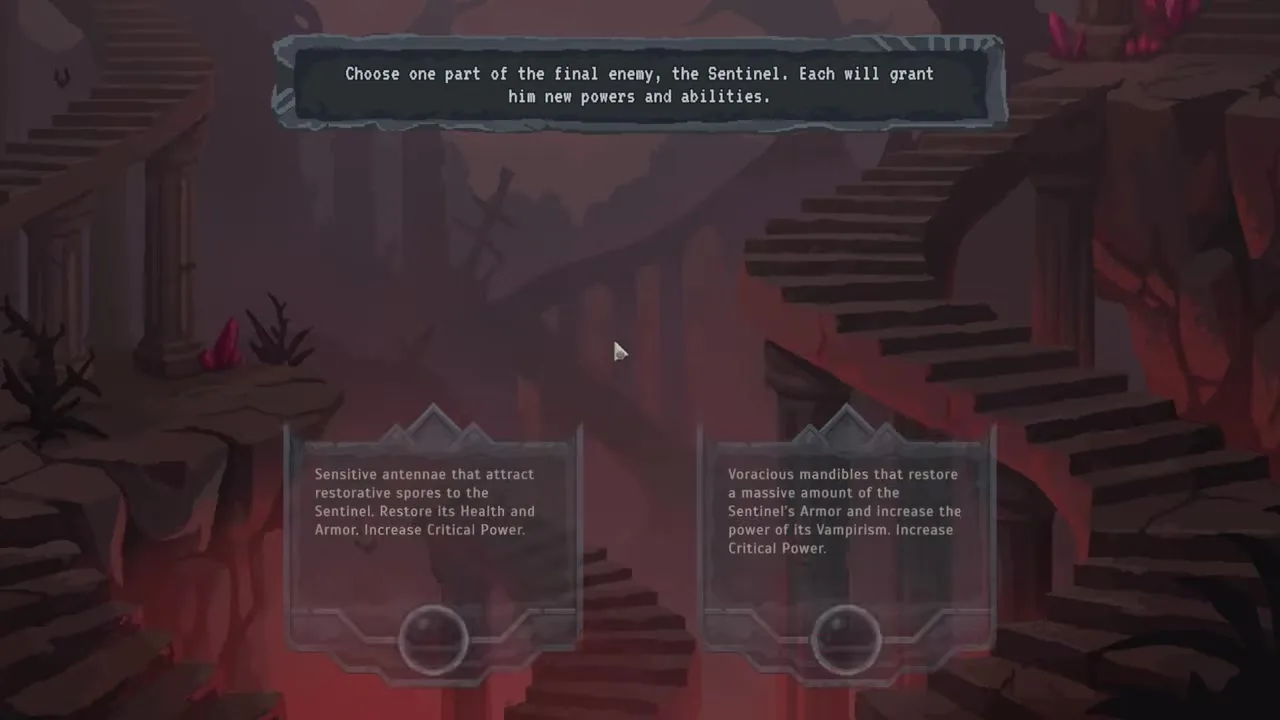
Three biomes means three parts on the final body. A HeadClick 1.0 run ([I8QzZBQV0Fw](https://www.youtube.com/watch?v=I8QzZBQV0Fw)) shows the first pick around the Dungeon gate and a second pick later in the same expedition, then the assembled fight. Official copy does not name a fourth biome. Route catalog: map.
The [Lootbound beginner writeup](https://intoindiegames.com/walkthroughs/tips-tricks/lootbound-beginners-guide/) lists the run as: route the biome → fight → loot → pack → recruit → craft the boss → finish the biome. “Craft the boss” is the part pane. The expedition closer is the Guardian those crafts become.
Once you know when the pane appears, the only decision left is which card you can live with.
Pick for the party on the board, not for a screenshot. This is the mid-run decision table for Lootbound bosses — situation to action. Named cards stay TBA. The rows use community-observed 1.0 modifiers (vampirism, crit power, health / armor over time, thorns) as examples, not a roster.
| If your party is… | Prefer the part that… | Refuse the part that… |
|---|---|---|
| High armor / Paladin soak | Adds boss HP or armor-over-time you can outlast | Hands the boss crit, or vampirism you cannot outpace |
| Fragile / Bard-thin | Keeps damage narrow or slow | Adds thorns, wide damage, or focus-fire on the squish |
| Acid / Witch skip | You can ignore a plated closer | Adds reflect / thorns — Acid skips armor, not bounce |
| Slash-only, no Crush | A slower, fatter Guardian you can strip later | Crit + vampirism on a body you cannot burst |
| One tanky body, two glass | A “focus one member” style hit (community) | Anything that splashes the backline |
| Already stacked thorns / reflect | A modifier your bounce already answers | A second damage-amp you cannot soak |
Do not hand the final boss crit if you can see that option. Beginner notes and 1.0 commentary agree. In the HeadClick clip, the first pane is vampirism + critical power versus health + armor over time — they take the tankier card because “vampirism is scary in this game.” The second pane is more regen versus thorns — they skip thorns because the Bard dies. That is the drill: name the wipe, take the other card.
A [Technetbook review](https://www.technetbooks.com/2026/08/lootbound-review-art-dock-roguelike.html) calls the pane “two powerful buffs to bestow upon the Sentinel.” Correct reading: you are dressing the enemy. A “stronger” looking part is a harder closer unless your grids already answer it.
Blood Hand and Blood Head show up in older screenshots. They are not a hidden tier list — treat the names as unverified until the 1.0 roster is logged.
Matched by build plan, shared topics, and guide progression — not random related links.
Blood Hand and Blood Head appear on a closed-beta card pane archived at [Playtester](https://playtester.io/lootbound) (“Card selection screen with Blood Hand and Blood Head options”). That is a community-observed screenshot, not a published 1.0 index. Do not treat those two names as the full Lootbound bosses roster, and do not invent the rest of the body.
| Name / label | Status | What we can say |
|---|---|---|
| Guardian | Official (Steam, ArtDock) | Final boss you assemble |
| Sentinel | Official / community alias | Same closer — also a hub unlock label after a win |
| Boss Part | Official (Steam) | 1-of-2 choice at each biome end |
| Blood Hand | Community-observed / TBA | Beta card art — 1.0 name and effect not logged here |
| Blood Head | Community-observed / TBA | Same pane as Blood Hand — effect TBA |
| Vampirism + crit power | Community-observed 1.0 example | Seen as one side of a part pair — not an official item name |
| Health + armor over time | Community-observed 1.0 example | The “safer” card in that same pair |
| Thorns on the boss | Community-observed 1.0 example | Refused when a Bard was too thin |
A fake roster ranks. A missing roster does not. When 1.0 names are copied from the live pane, they belong on a future `/guardian-parts` index — not as guesswork on this page. Until then, decide from the modifier text in front of you.
Steam says Guardian. Reviews say Sentinel. After a win, 1.0 UI can unlock a Sentinel seal and a new difficulty. Treat Guardian and Sentinel as the same assembled boss, not two raid wings.
The fight itself uses the same combat rules you already have — you just scheduled the modifiers.
The Guardian is still Lootbound combat: turn-based, one hero click, companions on their own grids, initiative on the bar. Armor refills after trash; Health does not. Bank mana for this room. The part stack is the only new information — it tells you which type and which body to protect.

| If the parts stacked… | Open with… | Do not… |
|---|---|---|
| Crit / vampirism | Kill or strip before the first big swing; keep Health off the floor | Walk in on a half Health bar |
| Thorns / reflect | Acid skip or a hit that does not bounce your thin bodies | Cleave with a Slash-only Bard |
| Fat HP + armor-over-time | Crush to break plates, then Slash / Base to finish | Dump mana into more Slash on armor |
| Focus one member | Put the soak on that body; keep the glass off the pip | Clone the hero kit onto the recruit |
| Unknown text | Read it as “what deletes my thinnest body?” | Pick the card with the cooler art |
Buffers and debuffers still die first on the way in. The Guardian is the last pip that matters. If a leftover elite is about to eat a companion spend, finish the sliver on the hero turn. Full click rules: combat.
Slash cuts Health once armor is gone. Crush breaks armor. Acid skips armor. Chaos strengthens debuffs. Base always applies. A Slash-only party stalls on a plated Guardian; seat Crush or Acid on the hero or a recruit before the last gate. Matchups: damage types.
If the closer still wipes you, it is usually a process error — not a missing legendary name.
A wipe on Lootbound bosses is usually one of four things: you handed crit, you walked in hurt, the type could not finish plates, or a companion trigger dumped the spend on the wrong pip. Reviews also flag hidden enemy dodge / crit — a packed Paladin can still eat a spike. That is RNG on top of a bad part, not instead of one.
| What you saw | Likely cause | Fix before the next gate |
|---|---|---|
| One shot on a full armor bar | Crit part, or a hidden boss crit | Refuse crit on the pane; keep a defensive spend |
| Party melted after you hit | Thorns / reflect into a thin grid | Acid skip or do not swing the glass |
| Fight stalled for minutes | Slash into plates, no Crush / Acid | Recruit the missing type |
| Mana empty on turn one | You spent the bar on trash | Basic attack until this room |
| Bard died first | You accepted wide damage or thorns | Pick the slower card next time |
| Companion burned a big skill | You packed their trigger, then left a sliver | Finish the sliver on the hero click |
Armor comes back. Health does not. Campfire before the last biome stretch, not after the wipe screen. Consumables stay on the hero — a potion parked on a recruit will not drink itself.
Once the third part locks, leftover stash cannot help. Rotate the answer onto the body that will click or auto-act. Auras that flip Slash to Crush belong in the closer, not in the bag. Pack habit: inventory. Lane: builds.
If the same wipe repeats, it is a process list — not a new part name.
Scan this before the next biome gate. Situation to action — not another loop recap.
| Mistake | Fix |
|---|---|
| Skipping the pane to “save” a pretty pack | The part is the next fight — pick one |
| Handing the Guardian crit | If a card reads as crit, take the other one |
| Giving thorns to a boss while a Bard is glass | Name the thinnest body, then refuse that card |
| Reading the pane as a self-buff | You are dressing the enemy |
| Walking in with unpacked shapes | Rotate them or they are not in the fight — inventory |
| Slash-only into a plated closer | Seat Crush or Acid — damage types |
| Empty mana at the Guardian | Bank spends on trash — combat |
| Treating Health like armor | Campfire before the last stretch |
| Inventing a twenty-part tier list | Decide from the two cards in front of you |
| Ignoring the route that feeds the gate | Chests and recruits before the pane — map |
At every biome-end pane, point at your thinnest portrait and ask which card deletes that body. Take the other card. Two seconds there prevents most “unkillable until the Sentinel” runs.
When that is automatic, the sequel is the route that gets you to the pane with a kit still intact.
At the end of each biome you choose one of two Boss Parts. Those parts change the final Guardian’s appearance and power. After Dungeon, Forest, and Desert, you fight the assembled Guardian / Sentinel.
The expedition closer. Steam calls it the Guardian. Reviews and 1.0 UI also say Sentinel. It is the same boss, built from the Boss Parts you picked at each biome end.
One per biome. Three confirmed biomes means three parts on the final body. There is no published fourth biome.
Yes. Steam says each part changes appearance and power. That is why two runs do not share one scripted raid model.
Community-observed names from a Playtester beta screenshot of a two-card pane. Treat them as TBA examples, not a complete 1.0 roster. This page will not invent the rest.
Pick the modifier your party can live with. Refuse crit if you can see it. Refuse thorns / wide damage if a companion is glass. A high-armor party can outlast regen; Acid skips plates, not bounce.
No. The biome gate is where you pick a part (and often a short loot list). The Guardian is the closer after every biome is done.
No. Same rule as every fight: you click the hero only. Companions auto-act from their own grids.
The map page — how Dungeon, Forest, and Desert feed the next part. Then combat and damage types.
August 15, 2026
Matched by build plan, shared topics, and guide progression — not random related links.