
How do I play Lootbound on the first run?
Pick a class, take a map node, win a turn-based fight (hero only), rotate loot onto that hero’s grid, then leave the biome with a Boss Part. That is the loop this Lootbound beginner guide is built around.

Lootbound beginner guide: how to play the first run — pick a class, pack the grid, stack auras, and leave the biome with a Boss Part. Verified August 2026.
Watch the first-run loop — fight, rotate loot onto the grid, then decide when a dice room is worth the D20.
~12 min read
This Lootbound beginner guide is the how to play page for your first expedition: pick a class, win a turn-based fight, rotate loot onto a grid, then leave the biome with a Boss Part. Lootbound is a pixel top-down tactical roguelite from ArtDock, published by Dreland Enterprises, released on Steam on August 14, 2026 (App 3091140). Verified August 15, 2026 · Steam.
| Fact | Detail |
|---|---|
| Platform | Steam · Win / macOS / Linux · Xbox Series |
| Genre | Pixel top-down tactical roguelite |
| Mode | Single-player |
| Price | $14.99 · launch ~35% off to $9.74 until ~Aug 28 |
| Developer / Publisher | ArtDock / Dreland Enterprises |
| Steam | App 3091140 · 20 achievements · Mixed reviews at launch |
| Classes | Warrior · Paladin · Witch · Bard (Jester alias) |
| Damage | Slash · Crush · Acid · Chaos · plus untyped Base |
| Biomes | Dungeon · Forest · Desert |
| Combat | Turn-based · you control the hero only · companions act on their own |
Every Lootbound expedition starts solo. You pick one hero, leave the hub, and walk a node map. There is no second player and no party to micro until a companion room shows up. Treat the opening hour as a packing tutorial with combat attached — that is the whole point of a Lootbound beginner guide.
Confirmed roster: Warrior, Paladin, Witch, and Bard. Some writeups call Bard Jester — this wiki uses Bard and notes the alias. Per-class numbers stay TBA; first-run leanings that show up consistently:
| Class | First-run job | Lean |
|---|---|---|
| Warrior | Solo damage until you recruit | Slash; some runs also stack a reflect / thorns-style lane (item names TBA) |
| Paladin | Safest first hero if you want to live | Armor, Health, Resistance, Order |
| Witch | Armor skip and debuffs | Acid, Chaos, Mana |
| Bard (Jester) | Party support — weaker as a lone hero | Order, Dodge, instrument-style weapons (names TBA) |
Barracks stats help the first nodes. Game Room dice and Laboratory unlocks can wait until you have died once and know what you lack. The next screen is the fight — and you only get to click one character.
Combat is turn-based. Initiative sets the order. You click the hero. Companions resolve themselves from their own grids and triggers — a Bard heal, a Paladin hold, a Witch Acid poke. If you sit waiting for a companion hotbar, you will miss the actual game: the inventory you packed before the fight.
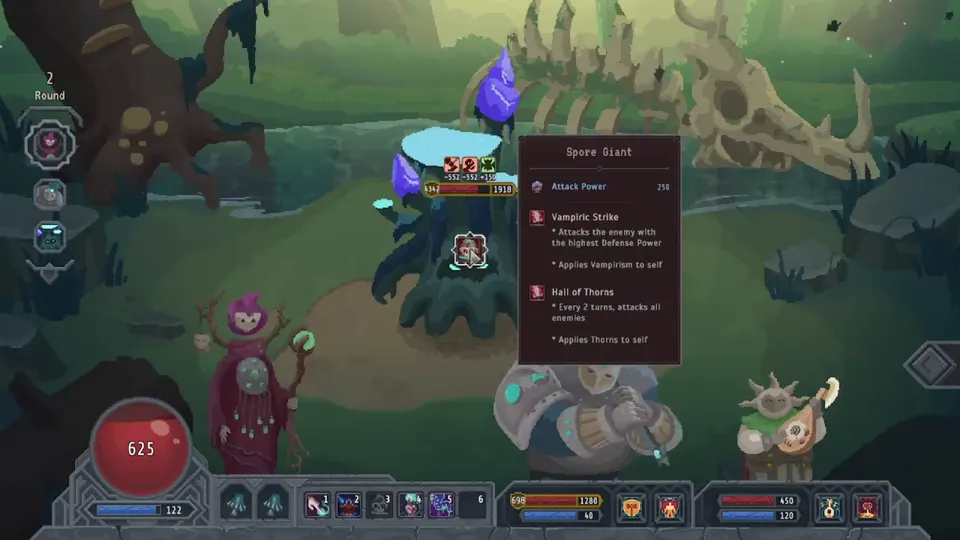
| Resource | What happens after a fight |
|---|---|
| Armor | Refills. Spend it. Ending a trash fight at 1 armor is fine if you are alive |
| Health | Stays damaged. Healing is scarce. This is the run resource |
| Mana | Only partly returns. Basic attacks are free; spent abilities are not |
| Initiative | Whoever is faster acts first — kill or strip a threat before it swings |
On trash nodes, a basic attack is often enough. Save Mana for elites, support enemies, and the biome gate. On those harder fights, use the opening turns to stack party bonuses, then spend the big hero ability when the damage preview says it actually finishes something. Leaving a mob on a sliver because you split damage is a first-run habit that snowballs.
Slash cuts Health once armor is gone. Crush breaks armor. Acid skips armor and hits Health. Chaos strengthens debuffs. Base is the untyped leftover that always applies. A first run that only stacks Slash will stall on plated enemies; keep one Crush or Acid answer on the hero or the first recruit. Full matchups live on damage types.
Once the fight pays out, the run is decided on the grid — not on the next node.
Lootbound has no helmet / chest / boots slots. Every item is a geometric block. It only works while it sits on that character’s grid. The hero and each companion have separate boards. A shape that fits the Warrior may not fit beside a Paladin aura. This is the mechanic a Lootbound beginner guide has to get right before anything else.
| Habit | Why it matters on a first run |
|---|---|
| Rotate before you commit | Long pieces live on the rim; the center stays free for auras |
| Lift the piece and read the pane | The game updates stats while the item is in the air — compare, then drop |
| Prefer compact shapes | A small legendary that keeps three aura contacts beats a huge high-rarity slab that deletes them |
| Cluster, do not sprinkle | Offense around damage auras, defense in one block, utility on the edge |
| Stash the maybe | Hold a future companion kit or a later swap. Do not dismantle the board that is keeping you alive |
Community 1.0 play uses labels such as legendary and divine for high-rarity drops. Treat the full rarity ladder and every named piece as TBA. What is already true: a smaller high-rarity piece that preserves contacts is often stronger than a 3×3 slab that forces three useful items off the board. Read the special effect before you rotate it in — some pieces scale after every battle, some only buff what they touch, some care about orientation. Hover again before a boss.
Some items project an aura into neighboring cells and strengthen weapons or armor that sit there. Slide one cell and Slash can become Crush, or a Paladin plate can stop receiving Order. Read the activation line: adjacent only, weapons only, instruments only — exact names stay TBA. One well-placed aura that touches several compact pieces outperforms a prettier pack that isolates it. Deep adjacency rules: auras.
You will want a second grid the moment a companion room appears. That is the next decision, not another solo upgrade.
Matched by build plan, shared topics, and guide progression — not random related links.
You start alone and pick up the other classes along the route. You still only control the starting hero. Recruits act on their own from initiative. The mistake is treating the new body as a second you — it is a second inventory with a job.
| Situation | Recruit / pack action |
|---|---|
| You are a Warrior drowning in plated enemies | Take Witch (Acid) or anyone carrying Crush. Do not add a second Slash clone |
| You are a Paladin and fights last forever | Take Warrior for Slash once armor is gone |
| You are a Witch and the hero keeps dropping | Take Paladin. Put armor and Order on that grid, not more Acid |
| You are a Bard and the first nodes hurt | Expect it. Bard is a support core — recruit a damage class as soon as the room appears |
| A great shape does not fit the hero | Stash it for the recruit instead of breaking the hero board |
| You just recruited | Rebuild both grids from scratch. Do not cram the new kit into leftover holes |
Warrior wants damage, Slash, and crit-style offense. Paladin wants Armor, Health, Resistance, and Order. Witch wants Acid, Chaos, and Mana. Bard wants Order and whatever makes the rest of the party hit or live — judge Bard by the team, not personal damage. Full roles: classes.
When a consumable rule is confirmed in 1.0, it is hero-only. Do not park the only heal on a companion grid and wait for the AI to drink it. Names and exact potion list stay TBA.
With two boards in play, the map stops being “whatever node is closest.” Route for the kit you still lack.
Confirmed biomes: Dungeon, Forest, and Desert. The third biome had a shortened demo layout — confirm the 1.0 path in-game. Between fights you will see blacksmith, training, campfire, companion, treasure, and D20 dice rooms. Early nodes should grow the grid. Later nodes should upgrade a kit that already works.
| Node | First-run rule |
|---|---|
| Fight / chest / biome-end loot | Priority in the opening biome — one strong shape can lock the lane |
| Blacksmith | Enchant a piece you will still wear in two biomes, not a temp drop. Gem / enchant names TBA |
| Training | A dice-style risk node. Extra dice help; they do not guarantee the roll |
| Campfire | Spend it before a dangerous stretch, not after Health is already critical |
| Dice room | Pick reward difficulty, then roll a D20. Failure can leave you empty-handed |
| Barracks / Game Room / Laboratory | Hub spend after the run: stats, dice, potions — not in-biome loot |
Take the hard line when the reward completes the kit you are already packing, when it is the only option that helps, or when you have an extra die. Otherwise take the safer upgrade. Gambling every room is how a healthy first run walks out with nothing. Route catalog: map.
Community 1.0 routing: chests and biome-end loot early (the gate list is a short pick of high-rarity pieces — exact offer size TBA), trainers and blacksmiths later once the shapes are stable. Act / biome naming in the UI may differ; the three confirmed biomes are still Dungeon, Forest, Desert.
The biome does not end on a random elite. It ends on a two-choice part that you will fight later as a Guardian.
At the end of each biome you choose one of two Boss Parts. Those parts change how the final Guardian / Sentinel looks and hits. After every biome, you fight the assembled boss. Skipping the choice is not a shortcut — it is how a first run walks into a Guardian it never planned for.
Community 1.0 notes: a high-armor party can live with a reflect / thorns-style modifier because armor soaks the bounce, while Acid ignores that armor. A single tanky body can accept a “focus one member” modifier. A fragile party should avoid wide damage. The one rule that keeps showing up: do not hand the final boss crit if you can see that option. Part names (Blood Hand, Head, and the rest) stay TBA until the 1.0 roster is logged. Catalog: bosses.
Once the grids are locked for the Guardian, leftover stash pieces cannot help in the fight. Turn them into hub currency for Barracks / Game Room / Laboratory. Exact conversion rates stay TBA.
If the first expedition still dies, it is usually one of the process errors below — not a missing legendary name.
Scan this before the next node. It is the mid-run checklist this Lootbound beginner guide is for — situation to action, not another loop recap.
| Mistake | Fix |
|---|---|
| Walking to the next node with loot still in the pickup pile | Rotate it onto a grid or it is not equipped — inventory |
| Forcing a hub “build” through Act 1 | Stay flexible until a strong shape and its auras appear, then commit |
| Equipping the biggest rarity and deleting three contacts | Keep the compact piece that preserves the cluster |
| Spending Mana on every trash pack | Basic attack unless the preview says you need the spend |
| Rolling every hard D20 | Only when the reward finishes the kit or you have a spare die |
| Waiting for companion controls | There are none — combat |
| Cloning the hero’s kit onto the recruit | Give the recruit their job: Crush/Acid, Order, or Slash — not a second copy |
| Camping a campfire at 10% Health | Heal before the dangerous stretch |
| Skipping the biome-end Boss Part | Pick one — it is the Guardian you will fight — bosses |
| Handing the Guardian crit | If a part choice reads as crit, take the other one |
After every drop, lift the new shape, read the pane, and ask whether it adds an aura contact or only occupies a cell. Two seconds there prevents most wasted first runs.
When the loop is automatic, the next page is the grid itself — rotate, rim vs center, and why a pretty pack can still be empty.
Pick a class, take a map node, win a turn-based fight (hero only), rotate loot onto that hero’s grid, then leave the biome with a Boss Part. That is the loop this Lootbound beginner guide is built around.
It never fit on the grid, or you unequipped it when you rotated another shape. Items have no fixed slots — inventory.
No. You control the starting hero. Companions take their own turns from initiative using the kit on their separate grid.
Warrior, Paladin, Witch, and Bard (Jester alias). 1.0 runs usually start one and recruit two of the leftover three — you field three of four, not the whole roster. Roles on classes.
Slash (Health), Crush (armor), Acid (skip armor), Chaos (debuffs), plus Base. Match the next enemy, not the prettiest aura — damage types.
Only if you can afford a failed D20. Extra dice raise the chance; they do not guarantee the reward.
Yes — Steam demo app 4290960. If the demo will not load, use the official demo page and verify local files there. The 1.0 Desert biome may be longer than the demo’s shortened version.
Steam buy-to-play (Win / macOS / Linux), App 3091140. Xbox Series has a store page. $14.99 · launch ~35% off to $9.74 until ~Aug 28.
https://discord.gg/artdock — ArtDock studio server. Join steps on Lootbound Discord.
The inventory guide — rotate shapes onto the grid so loot actually equips. Then auras and tips.
August 15, 2026
Matched by build plan, shared topics, and guide progression — not random related links.